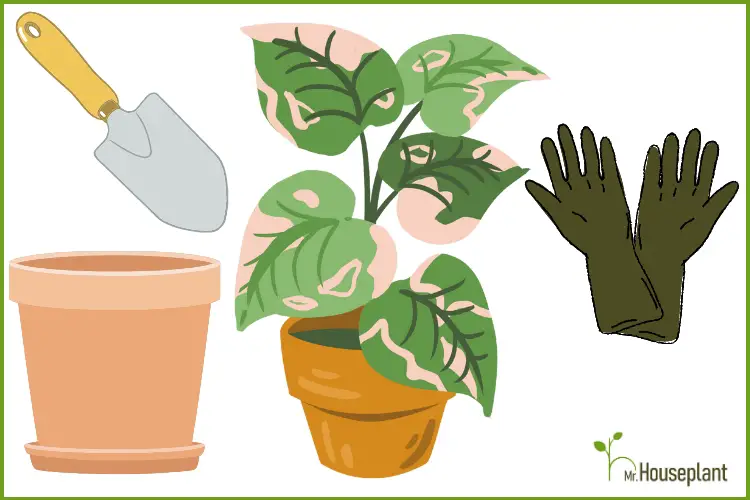
You bought your first houseplants and you don’t know how to repot it? Or perhaps you have some experience on how to repot a houseplant, but want to make sure you’re doing it properly? Either way, read on to learn how to properly do this very important step for the health of your houseplants.
Here are the several reasons why you have to repot your houseplants:
- As plants use nutrients from the soil for their growth, after some time the potting soil will become deficient in one or more nutrients. When the soil gets deficient in one or more nutrients, this prevents the plant from growing to its full potential. By repotting you are providing fresh, nutrient rich soil, so the plant can grow into the best version of itself.
- Mineral salts accumulate in soil from fertilizers and tap water. As they accumulate they start damaging the plant’s roots. The best way to remove excess salts is repotting.
- Potting soil compacts over time. As the soil compacts, the roots stop receiving sufficient oxygen. By repotting houseplants you are providing them with fresh non-compacted soil, with plenty of oxygen.
How Do You Know If Your Plant Needs Repotting / Signs Your Houseplant Needs Repotting
There are several signs your plant needs to be repotted:
- if the roots are coming out the bottom of the pot through the drainage hole
- If the roots are curled up at the soil surface
- if the pot is deformed or broken because of the large roots
- if the soil is drying out much faster than it used to (your plant is probably root bound)
- if you haven’t repotted in over a year
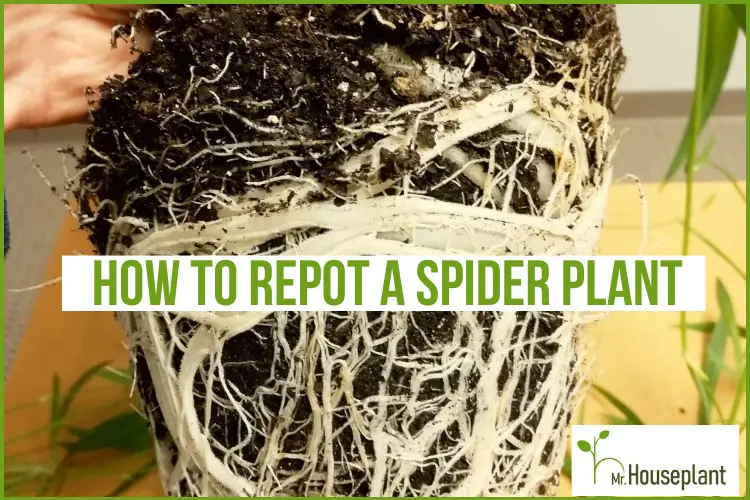
When you buy a plant, very often you will notice the roots are coming out the bottom of the pot through the drainage hole. Some plants will curl up their roots at the soil surface. These are signs that the plant is root bound, that roots don’t have sufficient space in the pot and the plant needs repotting to a new one.
Root systems of some plants are so strong they can deform or break a pot. This is the case with tuberous plants or plants that grow from rhizomes, such as snake plants or ZZ plants. Their roots are so strong that over time they cause planters to bend. If a pot is deformed or broken, it’s time to repot to a new one. Check out the video below for a demonstration of this.
Another way to tell it’s time to repot is if the soil is drying out much faster than it used to. If you have a plant which took 10 days to dry out and now it takes only 3-4 days, pull the plant out of the pot and inspect the plant’s roots. If you see a lot of roots and not a lot of fresh soil, it’s time to repot.
Even if you don’t experience any of these situations, it is recommended to repot all plants once a year, to reduce soil compaction, salt accumulation and nutrient deficiency.
Tools Needed To Repot Your Plant
Here are the tools you will need to repot your plant:
- A new pot (2″ larger pot than the old one)
- Potting soil
- Perlite or vermiculite or another coarse soil amendment
- A pair of scissors or pruning shears
- A repotting rake (optional, but very useful)
- A pair of gloves (if you’re handling a cactus or a plant with irritating sap, such as Ficus Elastica)
- A drop cloth to protect your workspace from dirt (optional)
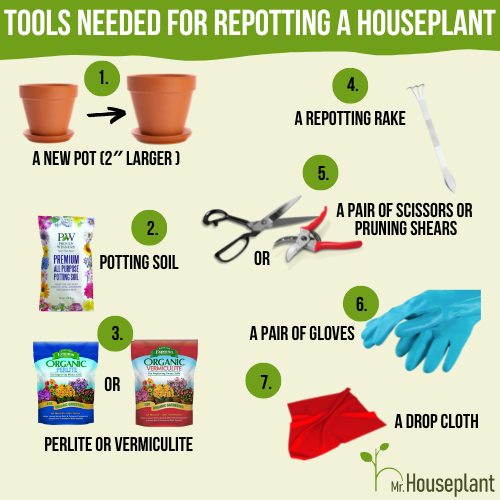
These seven tools are necessary during repotting process
How To Choose The Right Pot For Repotting A Houseplant
It’s important to choose the right pot size and pot material for repotting a houseplant. The new pot size should be 2″ larger than the current one and the pot should have a drainage hole. If a pot is too large, the soil will stay wet for too long, which increases the chances of root rot. You should also consider the material of the pot. Clay (terracotta) is an excellent choice because it’s porous and allows the soil to dry out faster than plastic or ceramic pots. If your plants are drying out too fast, go for a glazed ceramic or a plastic pot. They keep moisture in the soil.
I suggest only using pots with drainage holes. While it’s possible to grow beautiful plants in pots with no holes, it’s not something I would recommend to beginners. If you have a beautiful ceramic pot without a drainage hole, plant your houseplant in a plastic container with drainage holes and place it inside the ceramic pot. Use the ceramic pot as a cache pot. Or you can also drill a drainage hole in the ceramic pot.
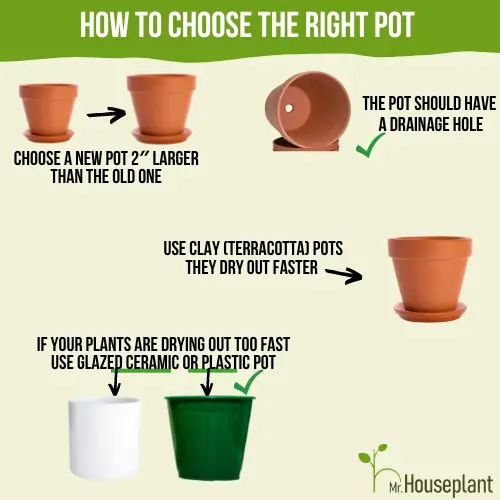
Which pot you will choose depends on your plant's needs
How To Choose The Right Soil
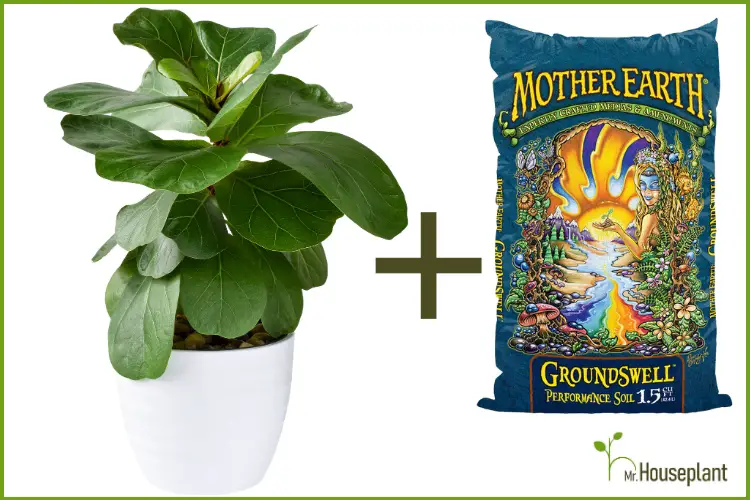
The type of soil you should use for repotting will depend on the specific needs of the houseplant. In general, it’s important to choose soil that is porous and well-draining and contains sufficient oxygen for the roots. For tropical plants, you should purchase a houseplant mix that contains coarse amendments, such as perlite, bark, or vermiculite. Mother Earth Groundswell is an excellent potting mix for tropical plants. For succulents and cacti, you should use a succulent or a cacti mix. Succulent and cacti mixes are very porous and they dry out fast, which is what succulents and cacti like. You can find out the soil requirements for a particular plant by doing some research or consulting with a gardening expert.
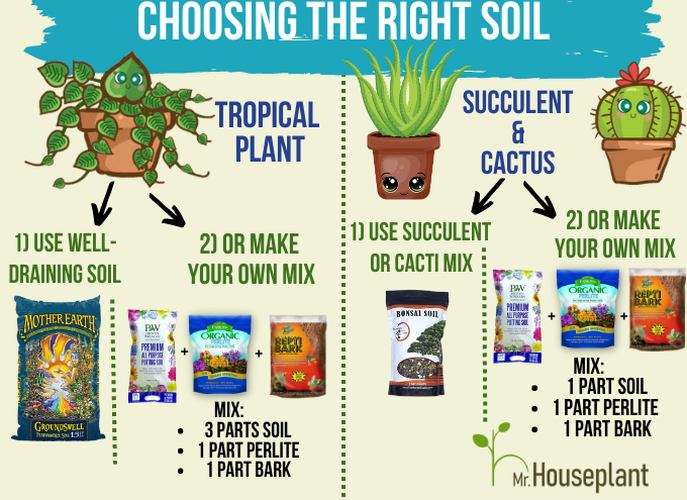
Make sure not to use the soil mix for tropical plants on your cacti or succulents and vice versa
You can also make your own soil. The mix that I like to use (the one in the video below) is:
- 3 parts regular potting mix
- 1 part perlite
- 1 part bark
Since these materials do not decompose over time, they will help maintain the soil structure with lots of oxygen. And plant roots need oxygen to be happy.
How To Repot A Plant (Step-By-Step)
Here is how to repot a plant properly:
- Remove the plant from its old pot
- Loosen the rootball
- Remove a part of the old potting soil
- Fill one-third of the new pot with fresh potting mix
- Add your plant
- Fill the pot with soil
- Water

Seven steps for the repotting process
Step 1 – Remove the plant from its current pot
Gently hold the base of the plant and lift it out. If the plant is difficult to remove, you can try gently squeezing the sides of the pot to loosen the soil. If you’re unable to squeeze the pot because it’s ceramic or terracotta, you can use a repotting rake to pull the soil away from the pot edges. This will make it easier to take the plant out of the pot.
Step 2 – Loosen the rootball
Gently squeeze the plant’s roots from all sides, and loosen them to encourage new growth. You can gently separate the roots with your fingers or a repotting rake.
Step 3 – Remove a part of the old potting mix
Once you have loosened the root ball, remove a portion of the old potting mix. This will help encourage new growth and remove old soil depleted of nutrients and full of salts which can damage the roots.
Step 4 – Fill one-third of the new pot with fresh potting mix
Fill one-third of the new pot with fresh potting mix. Choose a pot with drainage holes. You can also mix in additional materials with the soil such as perlite or vermiculite to improve drainage. There is no need to add gravel to the bottom of the pot.
Step 5 – Add your plant
Place the plant in the center of the new pot. The height of the topsoil should be about an inch below the pot edge. Add soil around the plant, tamping it down gently to secure the plant in place in its new home.
Step 6 – Fill the pot with soil
Continue to add soil to the pot until the pot is full. Make sure to leave enough space between the top of the soil and the rim of the pot to allow for watering. About an inch of space will be sufficient.
Step 7 – Water the plant
Once the plant is in its new pot, water it thoroughly to moisten the entire root system. Be sure to water the plant deeply, as this will help to settle the soil and remove large air pockets. Leave the plant to adjust to the new home.
Make sure you know what plant you have and which type of soil it needs – regular potting mix or a succulent/cacti mix.
Always amend regular mixes with at least 20% perlite, vermiculite or pumice. Since these materials do not decompose over time, they will help maintain the soil structure with lots of oxygen. And plant’s roots need oxygen to be happy.
The mix that I like to use (the one in the video below) is:
- 3 parts regular potting mix
- 1 part perlite
- 1 part bark
Select an appropriate pot by getting the next pot size. If your plant is in a 4” pot, get a 6” one. If it’s in a 10” pot, get a 12” one. If a pot is too large, it will contain too much soil, which would take a long time to dry out and can slowly lead to root rot.
I suggest only using pots with a drainage hole. While it’s possible to grow beautiful plants in pots with no holes, it’s not something I would recommend to beginners.
Remember that healthy roots are the basis of a healthy plant.
Some plants, peace lilies or oxalis for example will get visibly stressed after full repotting, but a lot of houseplants tolerate this type of repotting well and show no visible signs of stress.
After repotting, water the plant so the soil can settle and get in contact with the roots.
How To Repot A Large Houseplant
Repotting a large houseplant can be more challenging than a small one, due to its size and weight, but with a little planning, it can be done successfully. You may want to get a friend to help you lift it and move it. Follow these steps to repot a large plant:
- Lay the plant horizontally
- Remove the plant from its current pot
- Loosen the rootball
- Trim any dead or diseases roots
- Fill one-third of the pot with new potting mix
- Add your plant
- Fill the pot with soil
- Water the plant
Step 1 – Lay the plant horizontally
For very large plants, you might need help from a friend. If the plant is very heavy, you may want to have a friend help you move it and place it horizontally on the ground.
Step 2 – Remove the plant from its old pot
One person can hold the pot, while the other takes the plant by the base and tries to pull it out. If the plant is not coming out, you may need to use a knife or scissors to cut the pot (for plastic pots) or to break it (for ceramic or clay pots). You can also use a repotting rake to push the soil away from the pot edges and to separate the roots from the pot.
Step 2 – Loosen the rootball
Once the plant is out of the pot, squeeze the rootball from all sides to loosen it. Loosening it will allow the roots to spread out in the new pot. You can do this with your fingers or with the help of a repotting rake.
Step 3 – Trim any dead or diseases roots
Examine the roots to see if any are soft, smelly, and mushy. If yes, trim them off.
Step 4 – Remove part of the old potting mix.
Once you have loosened the root ball, remove a portion of the old potting mix. This will remove old soil depleted of nutrients and full of salts which can damage the roots.
Step 5 – Fill one-third of the pot with new potting mix
Fill one-third of the pot with a fresh new potting mix. Choose a pot with drainage holes. You can mix in amendments such as perlite, bark or pumice to improve drainage. There is no need to add gravel to the bottom of the pot.
Step 6 – Add your plant
Place the plant in the center of the new pot. The height of the topsoil should be an inch below the pot rim, to allow for watering. If the topsoil is too high, remove some of the soil from below the plant.
Step 7 – Fill the pot with soil
Add soil around the plant, tamping it down gently to secure the plant in place in its new home. Continue adding soil until the pot is full. Make sure to leave an inch of space between the top of the soil and the pot rim, to allow for watering.
Step 7 – Water the plant
Water thoroughly to moisten the whole root system, to help the soil get in contact with the roots and remove large air pockets. Then let the plant adjust to its new home.
FAQ On Houseplant Repotting
Is there a bad time of year to repot?
No, there isn’t a bad time of year to repot. If a plant is in a tight container, you want to give it room to grow as soon as you can. Root bound plants generally can’t develop well. Some will stop growing, others will grow small leaves. Old soil is usually nutrient deficient, so you should give the plant new soil so it can get fresh nutrients. Over time salts accumulate in the soil, damaging the roots. The longer you leave a plant in this soil, the more the roots will get damaged. The best time to repot a plant is as soon as you get a chance.
Imagine wearing shoes that are two numbers smaller. Do you wait for the next season or do you buy bigger shoes as soon as you can? You know the answer 😊It’s similar with houseplants.
What is the best time to repot?
The best time to repot an indoor plant is in spring so the roots that are actively growing have time to grow into the new potting mix.
This doesn’t mean that you shouldn’t repot a plant if it needs repotting just because it isn’t springtime. The longer a plant is left without repotting, the longer it will suffer.
Should I wet the soil before repotting?
For tropicla plants, yes, it is recommended to moisten the soil before repotting. This can help to make the soil more pliable and easier to work with, and it can also help to prevent the plant from becoming too dry during the repotting process. For succulents and cacti, getting the soil wet will make it easier to repot. But if the plant has been watered recently and the soil is still wet, it’s best to not water again before repotting.
Should you remove old soil when repotting?
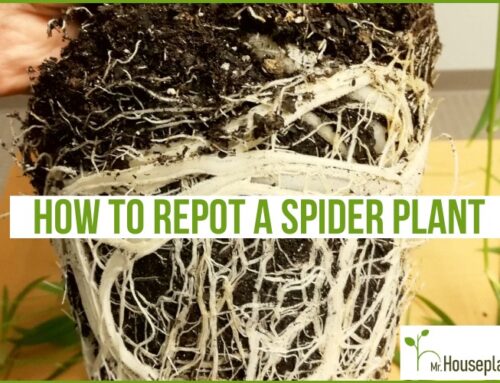
Yes, it is recommended to remove some of the old soil when repotting a plant. This is because old soil can become compacted over time, which can restrict the growth of the plant’s roots and make it more difficult for the plant to absorb water and nutrients. Removing some of the old soil allows you to loosen the root ball and remove any dead or damaged roots, which can help to encourage new root growth and improve the overall health of the plant.
When removing the old soil, you can use your fingers or a small tool like a repotting rake to gently loosen the soil around the roots. Use pruning shears to prune any dead or diseased roots. Once you have removed a sufficient amount of the old soil, you can then transfer the plant to its new pot and add fresh soil around the roots.
Should you break up roots when repotting?
Yes, it is generally recommended to gently loosen the roots of a plant when repotting it and to prune dead or diseased roots. If you want to keep the plant in the same pot, you can also prune some of the healthy roots. Pruning healthy roots will give the plant more space to grow. But beware, root pruning can be stresful for some plants and it can take them a few days and even a few weeks to recover. Root pruning will remove a part of sugars reserves that were stored in the pruned roots, and this can temporarily slow down the plant’s growth.
Is it ok to prune roots? Will it harm the plant?
Root pruning is a normal part of repotting where you remove dead and diseased roots, encircling roots and roots that have formed a “carpet”. Encircling roots and “carpet” roots will eventually start to constrict themselves, restricting the flow of water and nutrients.
It is also ok to cut off some healthy roots. For example, sometimes I don’t want to repot a plant into a larger pot even though it outgrew its existing pot. I might not have space in my home for a larger pot. In that case I will do a full repot of the plant, but I will cut off a few inches of healthy roots. This is perfectly fine. I wouldn’t recommend cutting off more than 30% of healthy roots at a time, as you don’t want to stress out the plant too much. And you want to leave the plant with enough roots to be able to support all the stems and leaves.
Root pruning promotes root branching. Similar as when you cut a plant stem, plant roots will generally branch out at the point of the cut.
Remember that healthy roots are the basis of a healthy plant. There is a big difference in the longevity of an average houseplant tree and for example of a bonsai tree. The difference in their life expectancy i.e. 5 years for a houseplant vs. 200 years for a bonsai tree is in the way the roots are treated. Healthy roots and proper root management are the reason why bonsai plants live hundreds of years.
How much soil should I add when repotting?
Fill one-third of the new pot with fresh potting soil. When repotting a plant, you should add enough soil to cover the roots and anchor the plant in place, but not so much that the plant is buried too deeply in the pot. The exact amount of soil that you should add will depend on the size of the pot and the size of the plant.
What is the difference between repotting and potting up
Potting up means moving a plant with its roots and existing soil mostly intact into a larger container and filling the space around the plant with additional soil whereas full repotting entails completely removing the old soil from the plant and potting into a fresh potting mix. Potting up is easier and recommended for beginners. There is less stress on the plant and the chances of damaging the plant are low. Full repotting is better for the plant long term, but due to its complexity, stress on the plant, and the higher chances of damaging, or even killing a plant, it is recommended for experienced plant parents.
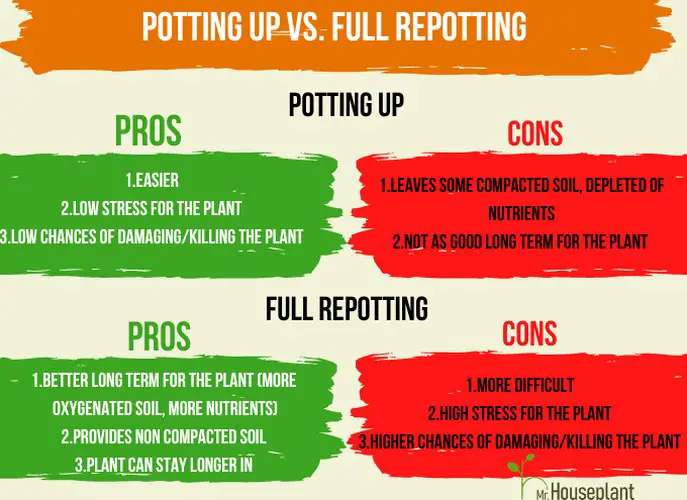
There are some differences between potting up and full repotting
I hope my advice will help you repot your plant with more confidence. Enjoy the process!
Yours Truly,


This is exactly what I needed to know! I’ve had plenty of success with my houseplants but I still question myself re replanting. Thank you!!
You’re welcome Carly, I’m glad you found the post helpful :)
Thanks for this. Need to repot my a monsteras after reading this. Lots of roots growing out the top and the bottom.
My pleasure Sarah!
I inherited a pothos that was my father in laws. He has it for 40+ years. I have now had it for 2. It is still alive, but I’m noticing it isn’t looking great. I cannot remember it ever being repotted, so I will try it. But, I am terrified of killing a plant that has been alive for so long and that my father in law had such pride in!
I can understand you. It’s scary doing something new to a plant that is that old and means a lot to you. My suggestion would be to not attempt full repotting if you don’t have a lot of experience with it. Better to just do a pot up, with slight loosening of the rootball, that shouldn’t stress the plant too much. It will at least provide some new nutrients for the plant.
Thank you!
I did it! It was terrifying! Lol
But, I did it and he is so happy! Thanks so much
I’m really happy to hear that Jean :)
Thanks for the info!! Where can I purchase that tool to loosen the plant from the terracota pot you are using in ur stories? 😃
Here it is :) https://www.mrhouseplant.com/recommends/repotting-rake/ (Amazon link) It’s a great tool, makes repotting so much easier and more fun
Hello I’m new to your blog and my question is I have a fiddle leave and I was noticing yellow spots and wholes on the leaves I Google it and it said it gnats problem I got so scared I thought it was like worm and I put bleach to the soil it was like some smoke coming out so I put lots of water just to drain the bleach I thought I had killed the plant some of the big leaf felt of I proceeded to remove all the leaf that where turning yellow and left it on my porch know I’m noticing that is not dead is growing new baby leafs and I wanted to know should I change the soil and bring it inside since is beginning to get some chill days ?
Hi Brenda, welcome :) Yellow spots and holes on the leaves are not related to fungus gnats. They don’t cause damage like that. I would recommend that you first take a look at my post on how to care for a fiddle leaf fig and feel free to post additional questions there. If you used bleach, I would recommend a full repot and removal of damaged roots. However, if you’re not very experienced, it might be better to flush out as much bleach as you can with thorough watering. And leave the plant outside until the temperatures start going below 55 degrees. If you have to move it indoors, I suggest getting a grow light, otherwise, you might have a very hard time keeping it alive.
Also I would suggest you take a look at my article on indirect light for plants. If you understand the these concepts, it will be much easier to rescue your plant :)
Thanks for the details . A very helpful post. I immediately need to repot a couple of plants.
You’re welcome :)
This was awesome and exactly what I needed to know! Thank you!!
You’re welcome Elisha! I’m really happy it was helpful
Just found your blog on repotting. Good information. I have a question about covering the big root (more mature) that were winding around the top of soil of my Fiddle leaf Fig. They have grown and formed a “hard bend” and don’t want to straighten out. Do these large roots need to be covered up with soil? I know the difference in aerial roots and anchor roots. Could this large curled root be an anchor root?
Hi Marty, you can cover the big root if you want, but you don’t have to. Your plant will be fine even if the thicker roots remain uncovered.
Awsome post , thanks so much for taking the time in making this
Hi Paige, thank you for visiting 🙂 Consider subscribing to the newsletter on the right side of the screen (or bottom if you’re on mobile) for updates.