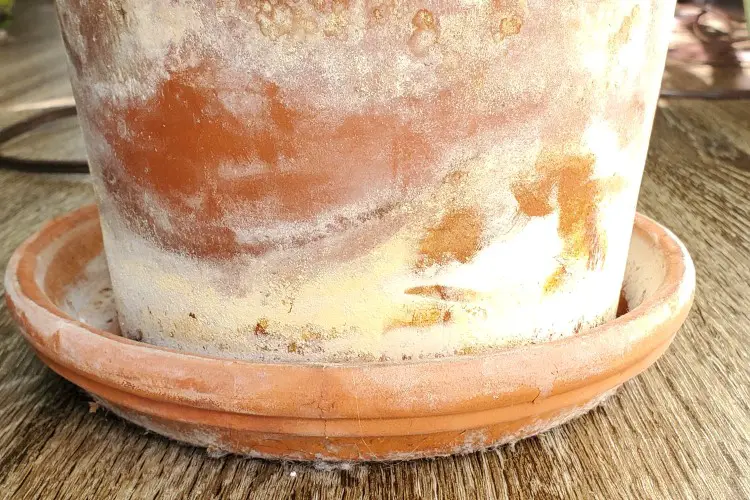
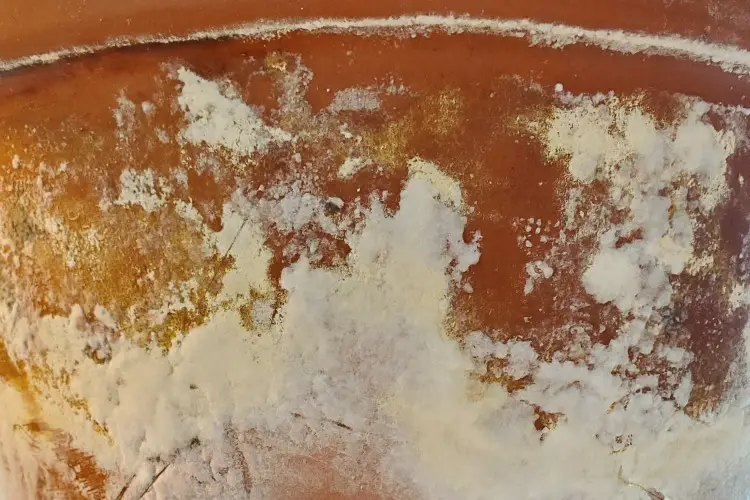
Have you ever wondered how to clean terracotta pots from white residue? Did you ask yourself why it’s there? Or perhaps you tried to clean it, but weren’t successful? Keep reading to learn the reasons for the white residue forming, see the quick and easy methods to clean terracotta pots, and learn how to prevent the residue from forming in the future.

1) Hard Water Deposits
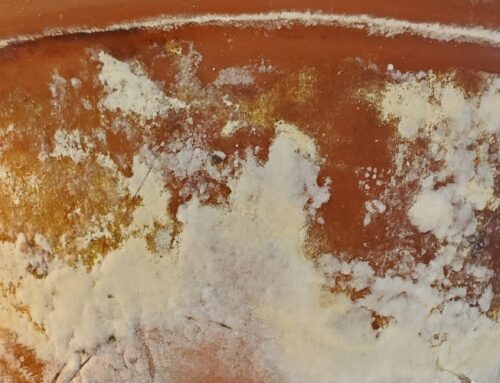
One of the reasons the white deposits appear on your terracotta pots is when you water the plants with hard water (tap water in most places). Hard water contains salts and minerals such as calcium. As the water evaporates, these soluble salts are left behind as white salt marks. It is similar to the white crust left on your shower head.
2) Fertilizer Leftover
If your tap water is not hard, your soil fertilizer is the likely cause of the white residue. Fertilizers contains minerals. Since terracotta pots are porous, the minerals seep through and are left behind when the water dries off.
If you keep terracotta pots outdoors in your garden, the rain should flush out some of the minerals. In that case, you won’t need to clean garden pots as often as indoor plant parents.
Can I leave the residue? Is it harmful?
I know many people love the crusty old terracotta pots look. I agree, crusty clay pots can look amazing 😊 However, the buildup of salts can damage plant roots. What you could do to keep the beautiful terracotta look and protect your plants, is clean the mineral deposits and mineral salts from the inside of the clay pots, while leaving the beautiful outside look.
Can I clean terracotta pot with the plant inside it?
Before applying any cleaning process, I suggest carefully removing the plant from its clay pot together with all the soil. After you’re done, you’ll be able to put it back in with the whole rootball intact.
I don’t recommend leaving the plant inside during the cleaning terracotta pots process as you won’t be able to clean the part that matters, the inside of the clay pot, and also, some of the cleaning clay pots solutions can damage the roots.
Cleaning Method 1 – Clean Terracotta Pots With White Vinegar
Using white vinegar is a cheap, easy and straightforward way to clean terracotta pots. The mixture ratio is 1 part vinegar to 20 parts water. First use a brush to scrub off dirt from the pots. Let the clay pots soak in the warm water and vinegar mixture for about 30 minutes, giving this vinegar solution time to start dissolving the deposits. After 30 minutes use a brush to scrub the inside, outside, and anywhere you find white spots.
This solution is safe to be used in the dishwasher if you can fit your clay pots inside! Set the dishwasher to maximum heat and the strongest water spray settings.
After you’re done, regardless of whether you used the dishwasher or manual cleaning clay pots method (e.g. with dish soap or baking soda paste), wash pots again, but this time using plain warm water. Get the vinegar out of the pot.
If you clean clay pots manually, be careful that you don’t break the pots.
If you’re still having a hard time getting terracotta pots clean, try the baking soda/water mixture. Mix some baking soda with water until you get a paste like consistency. The next step is to apply the baking soda paste to the white spots and scrub them with a brush. Continue scrubbing until the spots are gone and you have clean clay pots.
Some people like using dish soap in the mixture. Dish soap can be useful if you want your clay pots to be even cleaner. However, you don’t need dish soap to get the terra cotta pots clean. Baking soda will be sufficient. Note that dish soap produces a lot of bubbles and will make the rinsing process more difficult.
When you’re done, rinse the pots with clean water and let them air dry. Once they dry, they are ready for potting!
Check out the YouTube video below with the step by step process of cleaning terracotta pots.
Cleaning Method 2 – Clean Terracotta Pots With Bleach
Another method to clean terracotta pots is with household bleach. The mixture ratio should be 1 part bleach with 20 parts water. If your pot size is small, you can dip them in the solution for faster removal of the deposits. Otherwise, scrub the clay pots with this solution. After cleaning terracotta pots, let pots soak in clean warm water to remove the remaining bleach. Let the pot air out for a few days, so the smell of bleach is completely gone before using it.
Preventing Mineral Deposits – Tips To Keep Clay Pots Clean Longer
1) Leaching Soil
To prevent white spots on terracotta pots, leach the salts out of the soil every few weeks. Sometimes a thin white layer of the salts and minerals is visible on the soil. You can remove this top layer. Then thoroughly soak the soil, make sure all of the soil is wet. Leave it for 10-15 minutes, give the time for soluble salts to start dissolving in water. Then, place the pot in a sink or a tub and start pouring water into the soil. Let the water drain out the bottom to flush the salts. Repeat the process several times. Each following time the color of the water coming out will be lighter.
A buildup of salts can damage your plant, so it is good practice to flush the soil regularly, every couple of weeks. This method is tested and very effective.
2) Use Rain, Distilled Water or Reverse Osmosis Water
Although the ideal solution to this problem would be to remove minerals, plants needs them for growth and development. Instead, you can try decreasing salts by watering plants with distilled water or rainwater. Distilled water and rain water contain no minerals. If you have a reverse osmosis water filtering system in your home, you could also use the water treating with it for watering your plants. A reverse osmosis filter removes 70-99% of minerals from water. This is the system I’m using in my home.
Share this post with anyone else worried about how to clean terracotta pots and keep their plants healthy. Share your tips for cleaning terracotta pots in the comments below. And enjoy your gardening! :)
Yours Truly,


Thank you for this, really useful – I bought two really nice large terracotta pots, one I varnished on the inside, the other I did not. The one I did not varnish has all the residue, I have emptied, washed, treated with your vinegar tip! thank you ! then will varnish – like the other one…
My pleasure Annette, glad it was helpful :) I spray painted some of my terracotta pots. It does provide a great look and you won’t need to clean them, but I’m sure you know they will not be porous anymore, they will be like glazed terra cotta pots now. Which means the soil will stay wet longer, which is fine if your plants can handle it – if they are getting enough light and the potting mix is porous enough :)
Thanks for your helpful info. My pot, which is quite haevey, has had a plant in it for about 15 yrs or so. The plant is thriving, even thru some problems. I know you cannot clean pot with plant inside, but I cannot remove it. Is there something else I can do to clean it? I have been using a wet paper towel with a touch of dish detergent.
Thanks for your help.
Hi Carole,
Is the plant too big and heavy to be removed? I use a repotting rake to separate the plant and soil from the edges of the pot, take it out, clean the terra cotta pot and then put the plant with the soil back in. Plants that have been in soil for so long will usually have the rootball and soil pretty compact and can be pulled out as one piece, without the soil crumbling.
If the plant has been in the pot for so long, I do recommend repotting it eventually, it will benefit in many ways. I wouldn’t recommend a full report but just a pot up, or at least just adding an inch of soil on the top to provide some additional nutrients, although that will not help with soil compaction and oxygen for the roots, but it will be safer.
If you can’t take the plant out, try spraying the outside of the pot with vinegar, leaving it for a while, and then washing it off with water. You could use a turkey baster to remove water and vinegar from the saucer.
Thank you very much for sharing this awesome information. this is very helpful.
You’re welcome, I’m glad it’s been helpful
Hello, Thank you for your excellent post. Quick question to follow up though… if we want to continue to address salt or mineral build-up on any of our pots going forward, and want to follow your instructions from your post, do we plan to remove our plant every couple/few weeks to do your “soil wash” suggestion… or leave the plant in place while we totally wet then soak the soil??? I’ve read of “drenching” soil while plants are in the soil & pots but I don’t see how the spil can possibly dry fast enough to prevent root rot, especially for plants that aren’t terribly fond of too much water. This question (generally) has been on my mind for quite some time so any insight you might offer is MUCH appreciated… just like all the other knowledge you so generously share with us, readers. Thnx again!
Hi Brooke, one option is to take the plant out every couple of weeks and clean the pots. The second option is to take the plant out every couple of weeks and clean the pots. The third option is to reduce the accumulation of salts by watering your plants with distilled water and not fertilizing. Most houseplants will be just fine without fertilizer as the soil will provide them with nutrients, as long as you repot them regularly :)
You can also leech the soil every couple of weeks, to reduce the accumulation of salts. You asked how can the soil dry out fast enough in that case? I’m glad you asked :) If a plant is getting sufficient light (depending on the plant, aim for a minimum of 3,000 lux) and the potting mix is amended, the soil should dry out in a week max. If it takes longer, you should increase the light, get a grow light and/or repot into a better draining potting mix (that you will make, since most store bought mixed are not good enough).
what do you use for varnish
Hi Louise, are you looking to apply varnish to terracotta pots or to remove it?
Hi. I’m looking to apply varnish. What do you recommend? Thanks
Hi Georgie, I used different types of spray paint from a hardware store and they all worked well.
Thank you!
Thanks for the advice about removing the plants when the planters are being cleaned. As you said, doing so will allow us to clean the most important part of the pot. I’ll take note of this because I’m not sure if the stacking planter would be made out of clay. If so, I might need to get another pot to put the plants in whenever I need to clean it.
Hi Elaina, stacking planters that you were looking at are made of plastic
I use bottled distilled water, but the pot is still getting white? Wonder why?
Hi Heather, it’s possible that minerals out of the soil are leaching into the pot. Either from the soil, or from slow release fertilizer in the soil.